Showing posts with label craftiness. Show all posts

Sunday, February 5, 2012

Pinterest Worthy--Allowance Cans

E gets an allowance every month.

She tithes 10% to our church, half of the original amount goes into savings, and the rest goes into spending.

To make everything easier, I made these cans for her:


I just used a couple of clean cans from canned tomatoes, mod podged pretty paper onto them, and embellished with buttons, flowers, rhinestones, ribbon, tags, and alphabet stickers.

Aren't they cute?

Every once in awhile we take her savings to the bank and her tithe goes into her wallet.  The spending stays in the can until she's ready to spend it.

Usually, she just buys books from the book fair at her school; but the last six months she's been saving up for her own DSi.  She's currently got enough for the system, but needs a little bit more for games.

I'm so proud of her!

In a few more months, I'll have to make some for C, too.

So exciting!

Wednesday, February 1, 2012

Pinterest Worthy--Magnetic Board

Last week, I made two of these for the nursery at church:


I got the idea from Pinterest, but made them my own.

I had two old jelly roll pans too gross for baking and had Mr. Einstein spray paint the bottom and sides white. 
(Side note:  I could have done the painting myself, but I'm not very good at it.  I suppose I could have practiced, but I'm a little scared of how addicted to spray painting everything I'd get.)

Then I cut strips of scrapbook paper to fit, mod podged everything into place, and embellished with a ribbon.  Mr. Einstein hammered two holes into the top of each, then I added a combination of ribbon and hemp as a hanger.

Voila!

Two magnetic name tag boards; boys on the top, girls on the bottom.

Pretty cute, no?

Tuesday, January 29, 2008

Works for Me Wednesday--Easy Wall Decor, Part II

As promised, here is Part II of my ideas for easy wall decor. Check out Part I here.

When Cinderella was born, I really wanted to have her name displayed on her wall.

Have you ever priced decorated letters before? The prices are ridiculous!

So, I made my own.

I bought the letters at Devilmart for just over $1.00 each. After buying all my supplies, I spent less than $10.00 for the entire name. Of course, it helps my girls have fairly short names.


1. Paint the fronts and sides of each letter white. The back doesn't show, so unless you're really particular, who cares?

2. Stencil your selected design wherever you want to on the letter. I chose flowers and grass and only stenciled the bottom point of each letter.


This is one of Cinderella's letters. I really like the beveled edges.


This is one of Sleeping Beauty's letters. It has flat edges, but I could fit more of the stencil on it.


3. Measure your ribbon. Make sure you measure enough of it to tie a bow at the top. You can always trim the tails later.

4. Attach the ribbon on the back sides of the top point(s) of each letter with a staple gun.

5. Tie your bows, and hang.


Cinderella's name hangs from hooks on her wall.


Sleeping Beauty's name hangs from hooks on a little shelf. Yes, we have a bright orange wall in our nursery.

Voila! Cheap, easy names charming enough to decorate any child's room!

**********
For more ideas, check out Rocks in my Dryer.

Sunday, January 27, 2008

Bloggy Giveaways Carnival (CLOSED)

And the winner is: #139--Maren of The Secret Stitch Club! Congratulations!
**********


Yea! I love giveaways!

Once again, I am giving away some of my handmade cards. Fifteen, to be exact. One winner will receive all 15.

And, here they are (the pictures don't really do them justice):


They are all thank you cards, and I will include envelopes.

Just leave a comment. Any comment, but only one comment. Maybe tell me which one is your favorite? I'm curious to know what you all think about my creations.

I will ship to the US and Canada. Just make sure I can find your email address somewhere.

I will close this contest at 5pm PST on Friday, February 1st.

Good luck!

I have even more cards up for grabs here.

**********
For more giveaways, check out Bloggy Giveaways.

Tuesday, January 22, 2008

Works for Me Wednesday--Easy Wall Decor, Part I


Cinderella's room was supposed to be decorated with butterflies.

Of course, life's circumstances, and grandparents and great-grandparents, changed that quickly enough. In one Christmas, when she was 2, Cinderella got a castle rug, a Disney princess chair, and a princess Minnie Mouse.

A new room decor era was born.

Cinderella's room now is, of course, bedecked with a Disney princess theme.

It's fitting.

Her self-chosen name is, after all, Cinderella.

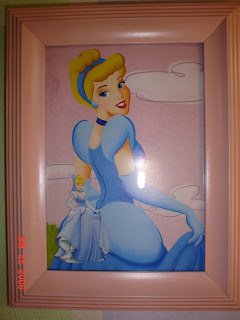
It took me awhile to get used to this new theme (and get the butterflies out of my head), but I have started to embrace the princess look, and have even contributed a few of my own touches. She has a castle clock which the two of us decorated, and, as of this weekend, these beautiful pictures:


They were so easy! Here's how you, too, can make this easy wall decor:

1. Find an old calendar and choose your favorite pictures. Yes, our 2007 calendar was a Disney princess calendar. Guess who picked that one out?

2. Find some cheap frames. I got these for $3.50 for each big frame and $2.50 for each little frame at Devilmart. They were a hideously nasty gold color. Blech!

3. Buy some spray paint of your choosing. I chose a matte pink. Since Cinderella's walls are, as you can see, painted with lavender and lime stripes, I thought a pink would be nice.

4. Have your out-of-town visitor your dad someone bored handy sand the frames down and spray them. That way, if any of the glass pieces get broken, you aren't liable for fixing them. (Did I just say that?)

5. While the paint is drying, cut the chosen pictures down to size. Embellish them, if you want. I found these darling dimensional stickers at Devilmart and added the appropriate princess to each picture.


6. Frame and hang. Voila!


Easy peasy!

Make sure you check back next week. I'll have another easy wall decor idea to share!

**********
For more ideas this week, check out Rocks in my Dryer.